The Managing Medical Certification functionality allows you to designate a physician, whether registered with EDRS or not, to indicate how a case's medical portion will be submitted, offline or online. Online certification is the method of having the physician electronically certify the case while offline certification brings the capability of supplying a medically certified paper death certificate into EDRS as evidence of the physician's certification of the case.
Funeral Directors may:
| A. | Designate a physician who is already registered with EDRS to notify them (through email) of their case whose medical information is pending. |
| B. | Designate a non-registered physician who wishes to complete the medical portion online. EDRS will then simply facilitate an easy means for the physician to complete and/or certify the case once they register and log on for the first time. (Note: Because a physician now has the capability of self-registering on EDRS, new physicians whose license numbers are not yet registered within the EDRS database will not have immediate access. They will be contacted by Help Desk with approval to using EDRS.) |
| C. | Designate a non-registered physician who wishes to complete the medical portion offline (on paper). A faxed New Jersey Certificate of Death (Form REG-18) with the medical portion completed by the certifying physician will be required. It will supply EDRS with the proper medical certification information needed to medically certify the case online. Once faxed, the certification becomes part of the official Death Certificate and undergoes the normal approval process with the designated local registrar. This process is known as Offline Certification. Therefore, when viewing the case's DC Form online, users will see the generated DC Form with the embedded fax images to display the name and medical portion from the REG-18 form. |
Managing Medical Certification tabs
Tab Name |
Tab Description |
||||||
Certification Method |
Allows the Funeral Home to designate or specify the physician which has certified or will certify the medical portion of the decedent's case. The Funeral Home must specify the physician by full name and license number; a Look-Up feature is available, however, new physicians and out-of-state physicians may not exist in the database. (To specify a new physician, you must first attempt to perform a look up first.)
The tab also allows you to decide on the Action to take with the designated physician; two options are available:
|
||||||
Cover Sheet |
If Offline has been selected, the decedent's name and medical portion of the REG-18 DC is required by EDRS so that the case is considered medically certified by the designated physician. To help EDRS identify which case your faxed REG-18 DC form belongs to, you must provide a bar-coded cover sheet along with your fax. This tab allows you to print a case-specific bar-coded cover letter to fax along with the decedent's DC, as completed and signed by the physician. Note that any personal information (other than the "Name as Known by Physician" field) on the DC is unnecessary. |
||||||
Fax |
Allows the Funeral Director to check and review faxes (multiple faxes are allowed should any distortions occur during a single transmission), identify the medical and name region on the faxed DC, and submit the final merged DC. The merged DC will consist of EDRS's electronic personal information in combination with images of the faxed medical and name portion extracted from the faxed DC. |
To manage the medical certification of a case:
| 1. | Click on the corresponding case ID from the Welcome screen. |
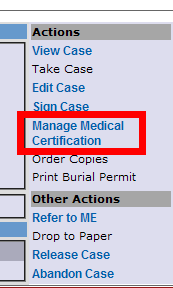
| 2. | Click on the Manage Medical Certification link on the Actions menu. |
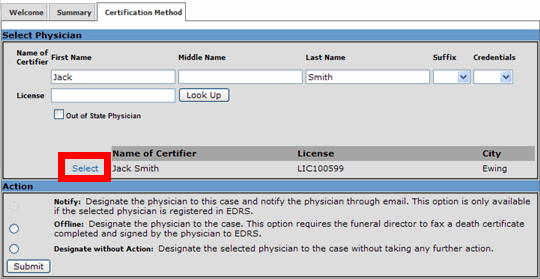
| 3. | At the Certification Method tab, enter as much information about the physician in the appropriate name and/or license number text boxes. Then, click on the button. |
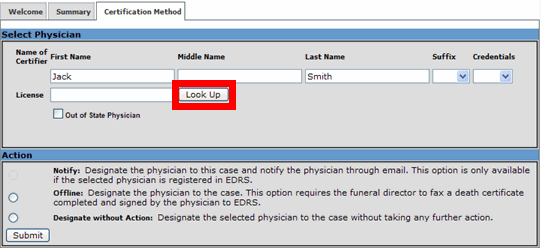
| 4. | [Existing/Out-of-State Physicians] A results list will then appear underneath. Examine the list for the correct physician of the case. When you have found him/her, simply click on the Select link and their license information will populate the all of the appropriate fields above. If you have not located your physician within the results, and if the physician is an out-of-state physician, check the Out of State Physician checkbox. Do not check the checkbox if the out-of-state physician has been found in the search results list. |
| 5. | [New Physicians] On the other hand, physicians whose license information is not in the EDRS database are still allowed to be designated through the New Physician checkbox that appears. You must be assured that the new physician's information is entered correctly: full name, license number, and phone number. The information you enter will be used as reference if the physician decides to self-register on EDRS and certify your case online. Note: The New Physician checkbox only appears after an attempted Look-Up returns with no results. |
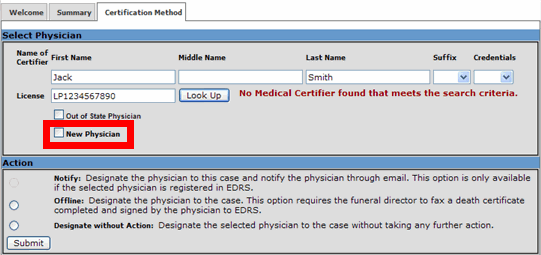
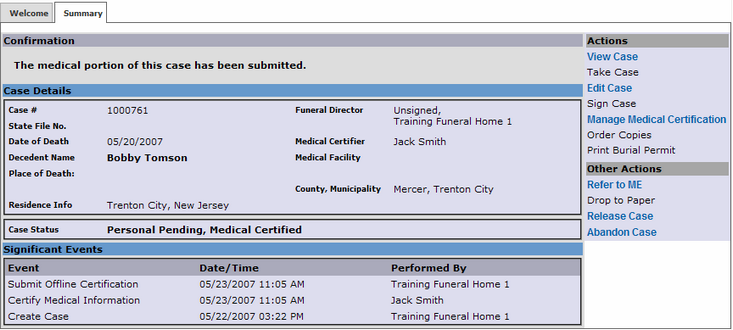
| 6. | Once designation is complete, you must specify the action to take regarding medical certification. Select either Notify, Offline, or Designate without Action. Click to proceed. If Notify or Designate without Action has been selected, the Summary tab will appear and display a confirmation message, concluding your task. |

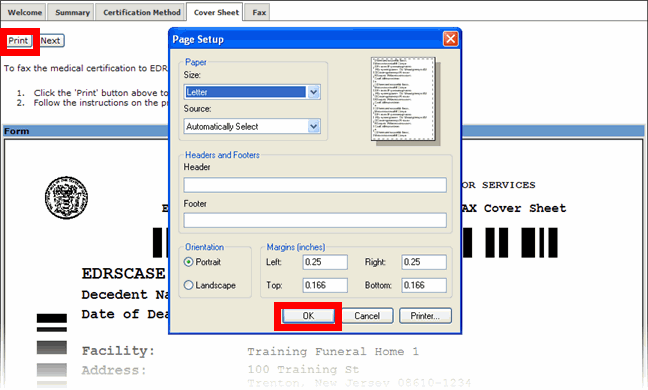
| 7. | [Offline Certification option] On the other hand, if Offline has been selected, you will be taken to the Cover Sheet tab. Before printing the cover sheet, adjust your page setup on your browser to print on Letter-sized paper (see instructions here). Then, click on the button to print the EDRS Cover Sheet. |
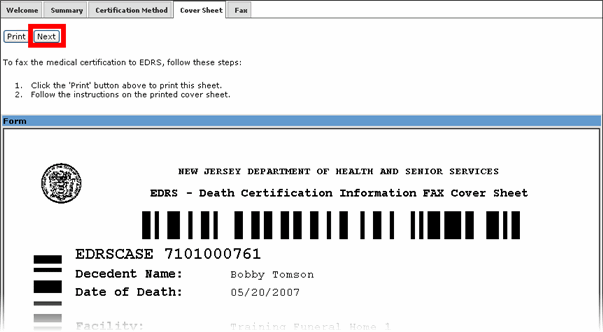
| 8. | When the cover sheet has been successfully printed, follow the instructions on the cover page. You will be required to fax both the cover sheet and the medically-completed REG-18 death certificate form to EDRS. (Following the fax, you are required to file the original REG-18 within your files.) After you have faxed the two documents together, click to proceed to the Fax tab. |
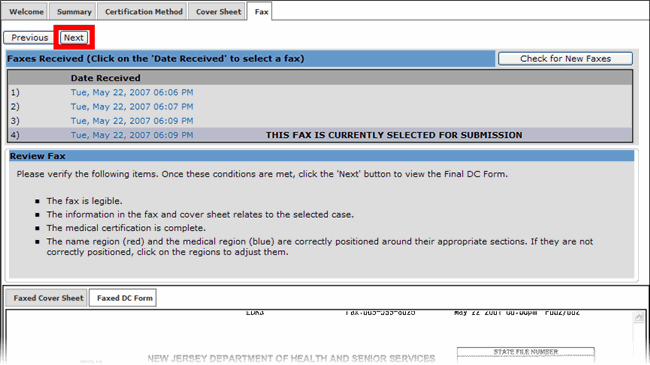
| 9. | At the Fax tab, you should be able to see your fax within a minute or two after it has been transmitted. (If you do not see your fax after a few minutes have passed, click on the button to refresh the page.) Multiple faxes are allowed and all of your faxes appear under the Faxes Received section. You may view other faxes by clicking on their corresponding date/time stamp under the Faxes Received section |
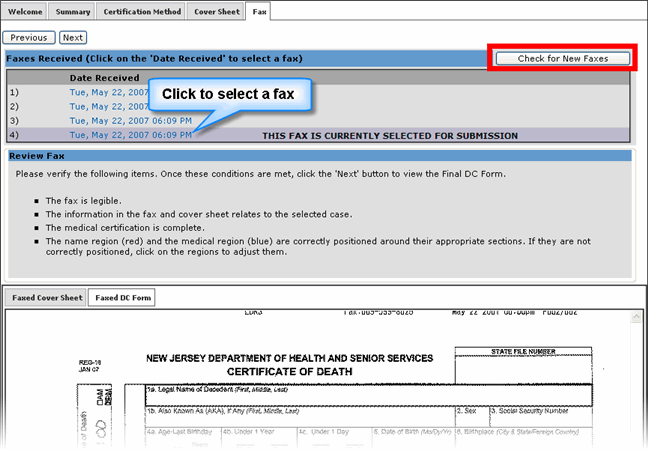
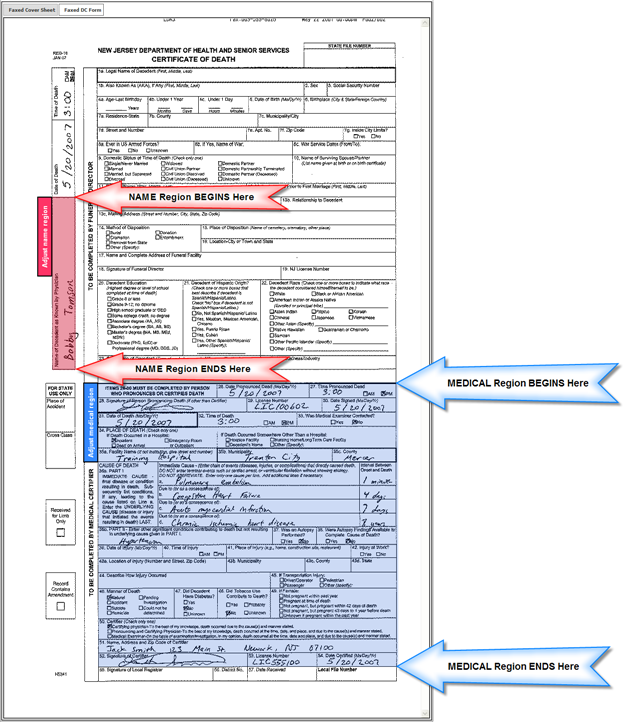
| 10. | The next step is to help EDRS define the name and medical portions of your faxed DC. Once your fax appears on the screen, examine the colored regions, red for the name portion and blue for the medical portion. Make sure that the regions highlight the proper fields as instructed on the top of Fax tab (also depicted in picture below). If adjustments are necessary, you may click on that region and reposition it (by dragging and dropping with your mouse) or resize it (using the red handles available on each side and corner of the colored region). |
Remember the following:
Red: captures the Name of Decedent as Known by Physician field ONLY
Blue: captures everything below, and including, the phrase ITEMS 26-30 MUST BE COMPLETED BY PERSON..., until the Local Registrar signature is reached. The Local Registrar section (Fields 55 'til the end of the form: signature, district no., date received, and local file no.) must not be included.
See the following video for assistance:
Adjusting the Name and Medical regions
|
Faxing: If any significant content is missing on the fax you see on your screen, you may re-fax the documents (cover letter & DC). All faxed documents will be available for selection should you decide to submit any of the previous faxes. |

| 11. | Once both regions are properly highlighted, click to examine the merged DC form in its entirety. |
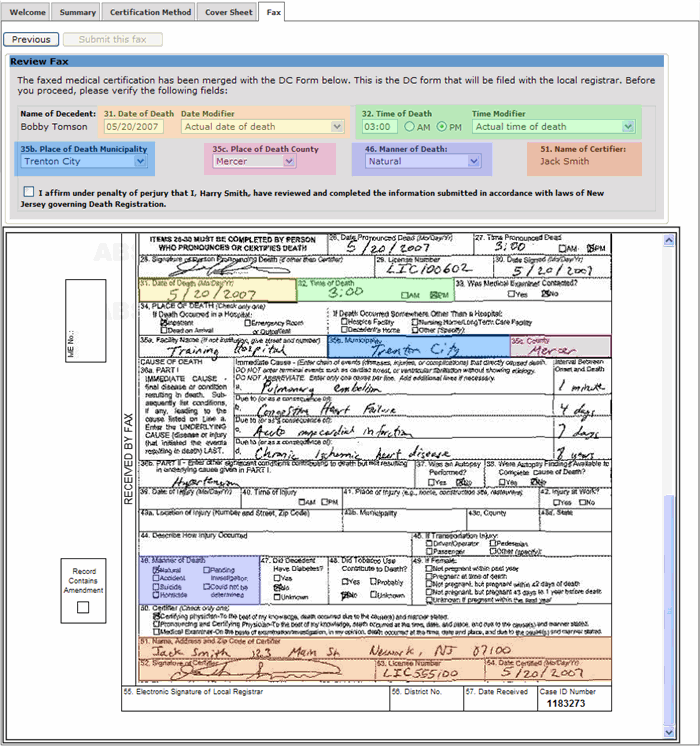
| 12. | Simply review the final DC for the captured name and medical data and ensure it is consistent with the case on EDRS. Use the scroll bar to view the entire DC as you are verifying the Name of Decedent and Name of Certifier. Also, verify that the Date of Death, Time of Death, Place of Death Municipality, Place of Death County, and Manner of Death fields are consistent in both the fax and the electronic case and, if not, modify them as necessary. |
| 13. | Click on the button if you are satisfied with the results. If you wish to re-adjust the regions, simply click on the button to head back to the adjustment page. Once the final DC has been submitted, the Summary tab will appear with a confirmation message verifying your submission. |
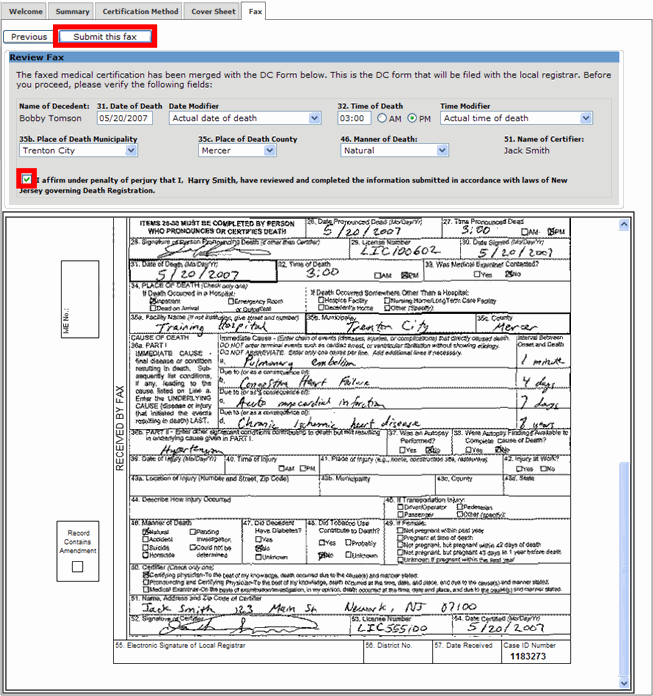
| 14. | Once the final DC has been submitted, the Summary tab will appear with a confirmation message verifying the submission. |