EDRS is organized into four active sections on the screen:
Section 1 |
Section 2 |
Section 3 |
Section 4 |
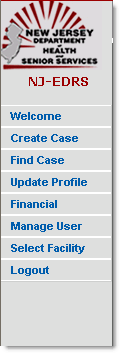
EDRS Main Menu
The EDRS Main Menu displays various general items pertaining to your role in EDRS.
|
Welcome Directs you to the homepage where you may view pending cases on your To-Do list or access any recent cases on the Recently Accessed Cases list. |
Create Case Allows the user to initiate a death case on EDRS. A case contains decedent information and all other information found on the death certificate. Cases can be saved at any time and resumed in the future. |
|
Find Case Allows you to perform a search to find a particular case. |
|
|
|
|
|
Update Profile Allows access to personal and facility information such as name, contact information, license/role information, login-related information, and facility profile information for regular updating. |
|
Financial Allows the facility administrator to add, edit, unlock financial accounts used for conducting EDRS transactions. It also lets the administrator view the transaction history for each account.
|
|
Manage User Allows facility administrators to manage users within the facility, offering the capabilities of adding users, creating users, editing users, and removing user associations with the facility. (NOTE: This option only appears to users who are facility administrators.)
|
|
Select Facility Allows you to select an alternative facility to work on your cases from. You will be presented with a Welcome screen of the new facility once you have made your selection. This is similar to logging out and re-logging in to select a different facility. (NOTE: This option only appears to users who are affiliated with several facilities.)
|
|
Logout Exits the EDRS application and brings you back to the Login screen. |
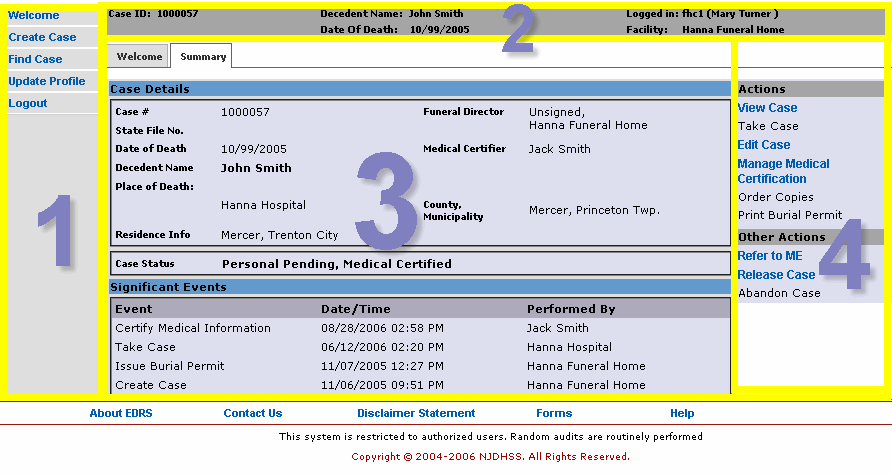
The Case and User Profile Information Section
This section of the EDRS screen displays brief information of the action being performed, the current case open, and the current user logged in. The action name is displayed on the far left when an action is in progress. The decedent name, death date, and case id of current case opened are on the left and center portion while the current users name and facility are displayed on the right.
![]()
The Details Section
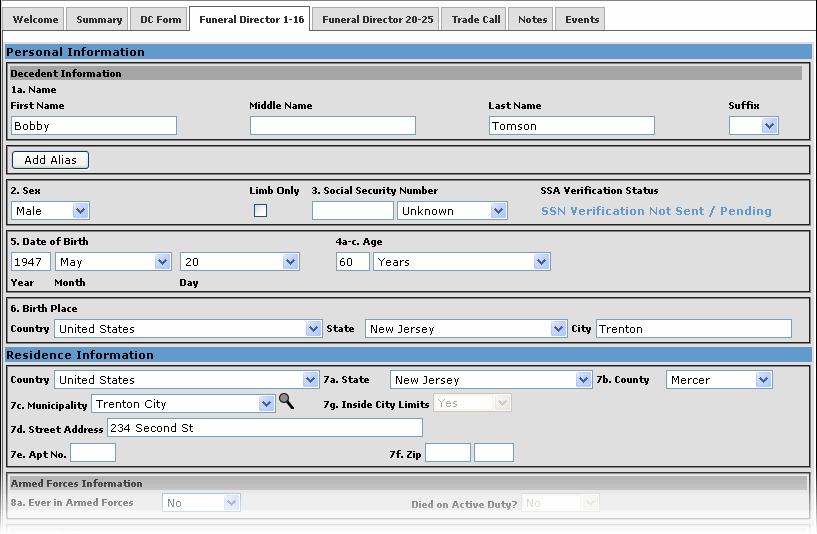
The most widely used section of the EDRS screen is the Details Section. This section displays action-related details, depending on what action you select from either of the EDRS menus (EDRS Main Menu or Case Action Menu). On login, the Welcome tab (synonymous to the Welcome main menu item) is displayed, by default, within the Details section. Also, for example, if a case is being viewed (View Case), case-related tabs such as Summary, DC Form, Funeral Director 1-16, Funeral Director 20-25, Trade Call, History, Notes, and Events are displayed in the Details section as well.
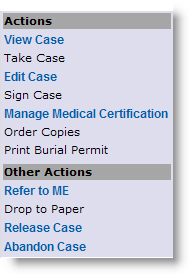
The Case Action Menu
The case action menu displays case-specific actions and is only accessible from the Summary tab. Depending on your profiles role and case status, certain actions are be enabled (shown in blue), disabled (un-clickable and shown in black), or not displayed at all on the menu (hidden). For example, the Sign Case action is only displayed and enabled if the current case is ready for certification and the user logged on is a licensed Mortuary Practitioner. On the other hand, if Sign Case is displayed but disabled (shown in black un-bolded font- such as in the figure below) then the user has certification privileges but, for the time being, the case details are incomplete so it cannot be electronically signed yet. Lastly, actions like View Case are displayed and enabled regardless of the case status.